NepTrainKit documentation
NepTrainKit is a desktop application for preparing, inspecting, and visualizing NEP datasets. It does not replace long GPUMD training runs on a server or the underlying DFT calculations. Instead, it handles the repetitive work around those stages: generating candidate structures, checking whether structures are physically sensible, removing bad samples, selecting representative subsets, and exporting clean data back into the DFT and training workflow.
If this is your first time using NepTrainKit, start with the two workflows below.
Generate candidate structures
Use Make Dataset to create candidate structures for a training set. These structures are not normally ready for training as soon as they are generated. Perturbations, defects, surfaces, and random occupations can produce atoms that are too close, unusually large forces, or otherwise unreasonable configurations. Inspect and clean the candidates before sending them to DFT.
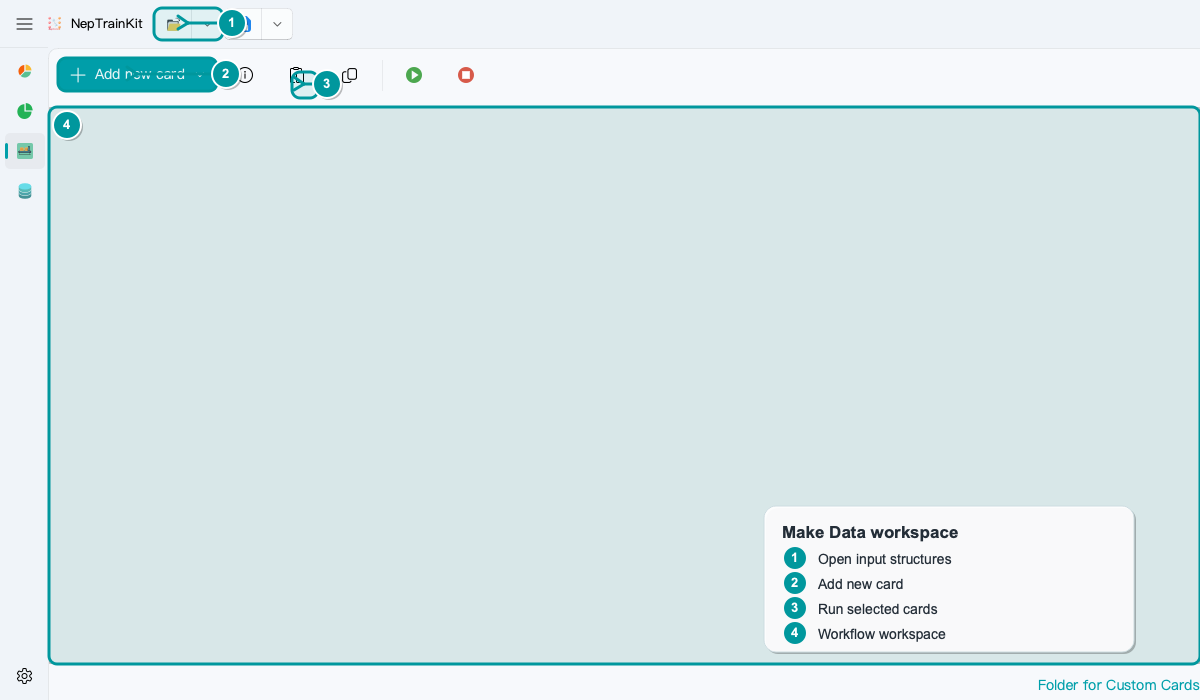
The shortest workflow has four steps:
Import the starting structures.
Add a generation or transformation card.
Select the cards to run, then click
Run.Check each card’s inputs, parameters, and output count in the workspace.
The example below shows a configured Lattice Strain card. It applies a controlled set of cell strains and is useful for adding structures near the elastic-response regime.
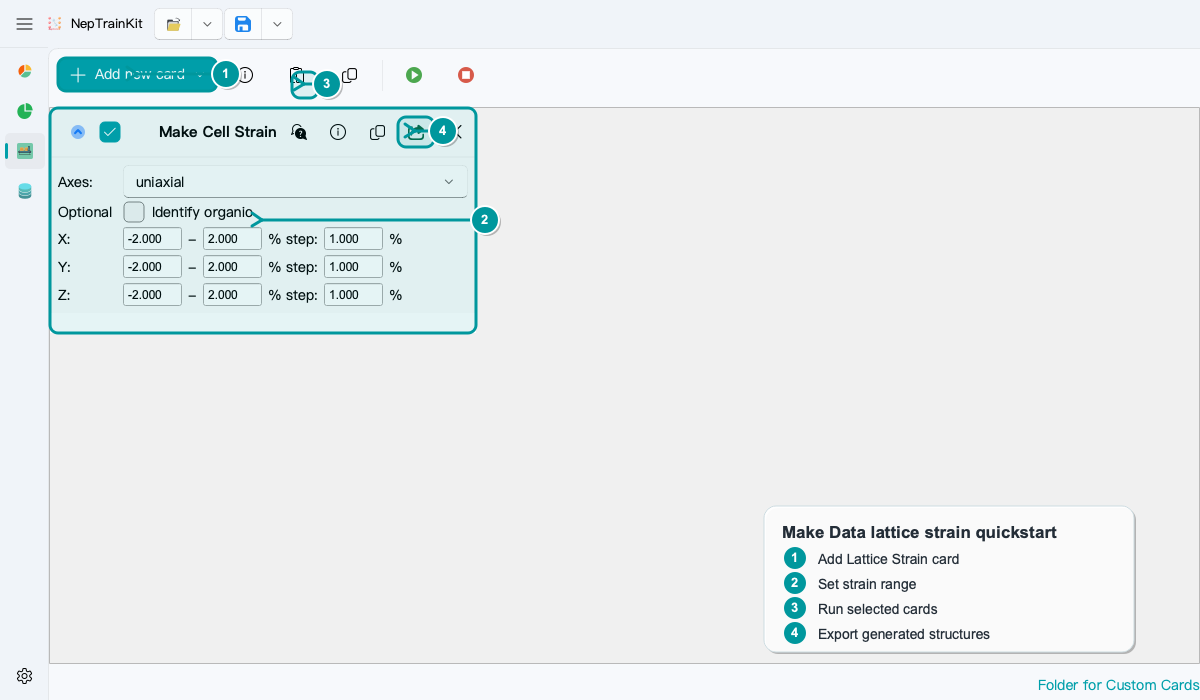
If you are unsure which card to choose, start with Make Dataset Card Guide. If you already know the physical objective, use Make Dataset Recipes. The complete candidate-cleaning workflow is documented in Clean Candidate Structures Before DFT.
Inspect and select structures
NEP Dataset Display is useful before training as well as after it. Import any collection of structures to inspect, tag, remove, or export them. For a large candidate pool from Make Dataset, a practical workflow is to run a quick prediction with the bundled or an existing NEP model, remove clearly problematic structures such as extreme-force cases, then apply farthest-point sampling and send only the representative structures to DFT.
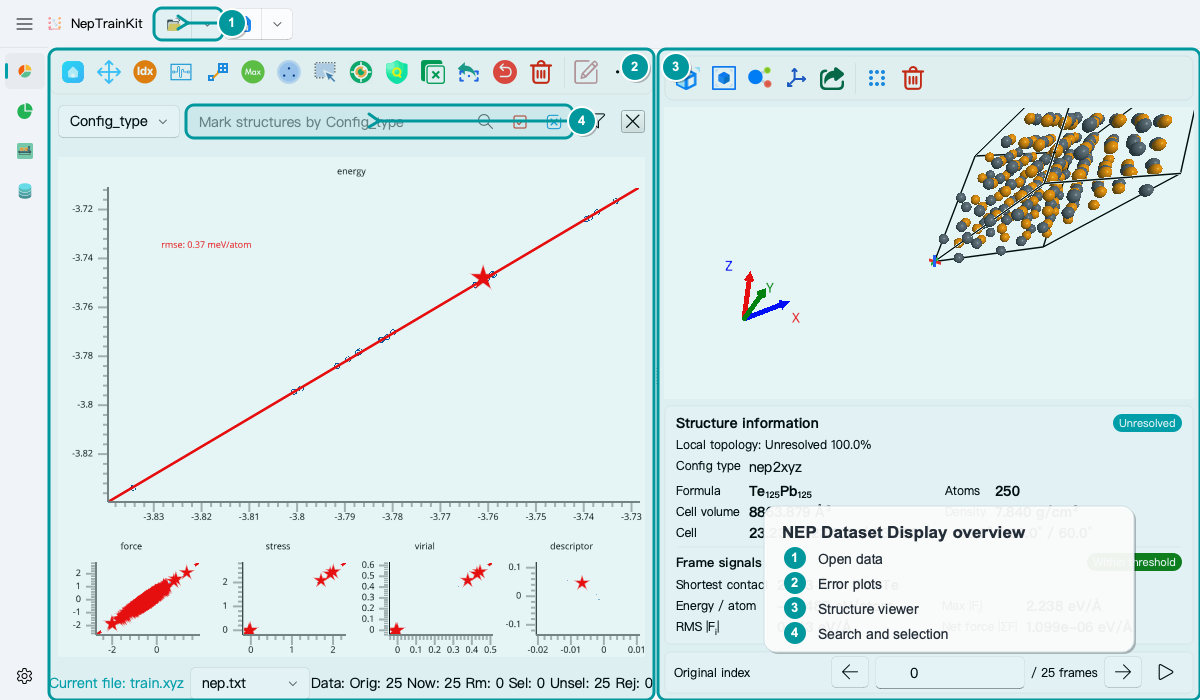
The four highlighted areas correspond to a typical inspection:
Open a candidate pool, training set, or training-results directory.
Use predictions, errors, or distributions to locate the most obvious problems first.
Inspect the corresponding geometry to decide whether it is a bad configuration, an intended boundary case, or evidence of a dataset gap.
Use tags, search, and selection tools to isolate those structures before exporting or deleting them.
See NEP Dataset Display Reference for a button-by-button reference.
A realistic end-to-end path is:
Make Dataset: generate candidate structures
→ NEP Dataset Display: inspect candidates and remove unphysical structures
→ FPS Filter or another selector: choose representative structures
→ DFT: label energies, forces, and stresses
→ GPUMD: train the NEP model
→ NEP Dataset Display: inspect the trained model and start the next iteration
Where to start
Install and launch NepTrainKit, generate a first candidate set, and understand why cleaning comes before DFT.
Take a pool from Make Dataset, remove problematic structures in NEP Dataset Display, then sample representatives for DFT.
Load training structures or results, inspect errors, isolate unusual structures, and export a subset.
Generate candidates for a specific physical objective, then connect them to the cleaning and sampling workflow.
Package an existing script as a reusable Make Dataset card for the team.
Installation note
NepTrainKit obtains its compute backends from the separate nep-adapters wheel. macOS and Windows provide CPU support; the Linux x86_64 wheel includes both CPU and CUDA. Installing the wheel does not require a local CUDA Toolkit, but CUDA calculations still require a compatible NVIDIA driver. See Quick start for the verification command.
Citing NepTrainKit
If you use NepTrainKit in your research, please cite:
@article{CHEN2025109859,
title = {NepTrain and NepTrainKit: Automated active learning and visualization toolkit for neuroevolution potentials},
journal = {Computer Physics Communications},
volume = {317},
pages = {109859},
year = {2025},
issn = {0010-4655},
doi = {https://doi.org/10.1016/j.cpc.2025.109859},
url = {https://www.sciencedirect.com/science/article/pii/S0010465525003613},
author = {Chengbing Chen and Yutong Li and Rui Zhao and Zhoulin Liu and Zheyong Fan and Gang Tang and Zhiyong Wang},
}
Documentation